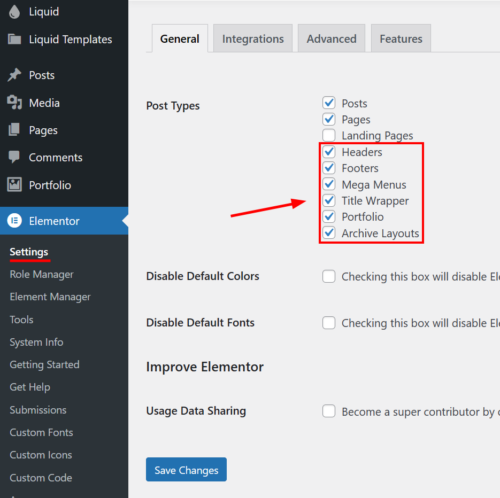
If you encounter the situation where you want to create or edit a header, footer, title wrapper, or archive template using Liquid Templates page, but the “Edit with Elementor” button does not appear, you can follow these steps to enable it.
Step 1: Access Elementor Settings
- Log in to your WordPress admin dashboard.
- Navigate to “Elementor” from the left-hand sidebar.
- Click on “Settings.”
Step 2: Configure Post Types
- In the Elementor settings page, locate the “General” tab.
- Scroll down until you find the “Post Types” section.
- By default, only “Post” and “Page” post types might be selected.
- Check the box next to the additional post types you want to enable Elementor for. These may include custom post types like “Header,” “Footer,” “Title Wrapper,” or “Archive Template,” depending on your theme setup.
- Ensure all the relevant post types for which you want to use Elementor are selected.

Step 3: Save Settings
- After selecting the desired post types, scroll to the bottom of the Elementor settings page.
- Click on the “Save Changes” button to apply your selections.
Step 4: Verify Changes
- Go back to the Liquid Templates page where you initially wanted to edit with Elementor.
- You should now see the “Edit with Elementor” button available for the selected post types.
- Click on the button to proceed with editing the template using Elementor.
By following these steps, you should be able to enable Elementor for custom templates such as headers, footers, title wrappers, or archive templates within the LogisticsHub WordPress theme.