LogisticsHub WordPress theme offers a seamless way to organize your website’s content through archive pages. Archive pages are essential for displaying a collection of posts based on various criteria such as categories, tags, dates, or custom taxonomies. With LogisticsHub, creating custom archive pages is a straightforward process that allows you to design and tailor them to fit your website’s needs precisely. Follow these steps to create archive pages effortlessly:
Step 1: Accessing Archive Page Settings
Navigate to Liquid Templates: Log in to your WordPress Dashboard and head to the Liquid Templates section.
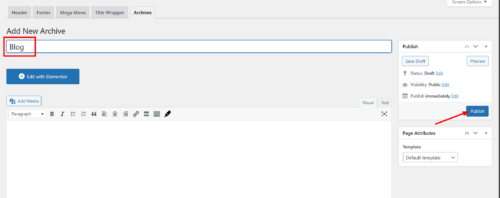
Create a New Archive Page: Click on the “Archives page” option, then select “Add New Page.”

Step 2: Naming and Publishing
- Name Your Archive Page: Give your archive page a descriptive name that reflects the content it will display.
Publish: Once you’ve named your page, click the “Publish” button to make it live on your website.

Step 3: Customizing with Elementor
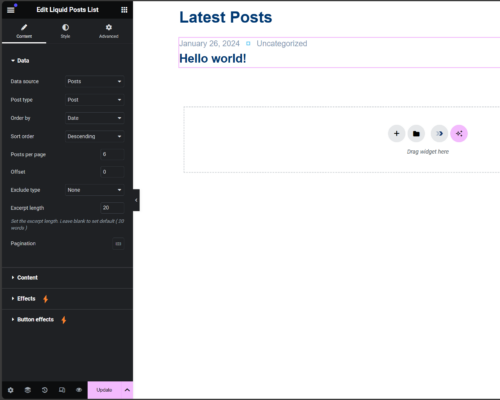
- Edit with Elementor: After publishing, click on the “Edit with Elementor” button to access the page builder interface.

Design Your Page: Use Elementor’s drag-and-drop editor to add elements, customize layouts, and style your archive page according to your preferences.

Step 4: Setting Archive Page Conditions
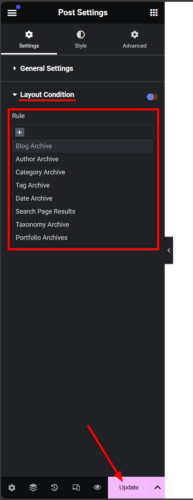
- Access Layout Conditions: At the bottom left corner of the Elementor interface, click on the settings icon.

Choose Archive Type: In the settings panel, navigate to the “Layout Condition” tab. Here, you can specify the archive type to which your page will apply, such as category archives, tag archives, author archives, or custom post type archives.

Update Settings: Once you’ve selected the appropriate archive type, click on the “Update” button to save your changes.
Step 5: Completion
You’re Done! Your custom archive page is now ready to go. Visitors can access it to explore your site’s content based on specific criteria.